Toubleshoot Power Problems
Toubleshoot Power Problems
Last update - 7/15/2014
This section will help to isolate possible power problems in the
DLC. It will not isolate any problems to any specific electronic
components on the DLC card, but will help isolate fuse or battery
pack or battery cell problems.
If you report power problems to CROPSCAN, Inc., please
provide the voltage readings from each of steps 3, 5, 8, 9, 10, 11, and 12
below.
Equipment required: small phillips screwdriver and a voltmeter
with a DC scale to about 20 volts.
The following steps assume that battery cells are installed in
the battery pack as pictured below.
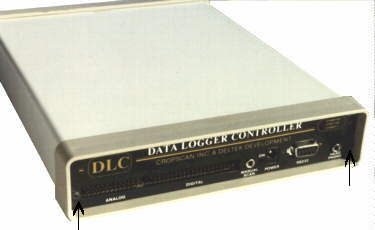
- Step 1) Loosen and remove the two screws on each side of the DLC front
panel.
- Step 2) Slide the front panel forward and remove the attached DLC card from
from the case:
| DO NOT press the hard reset button (red switch with black button in upper left-hand corner of DLC card as pictured below.) |
|---|
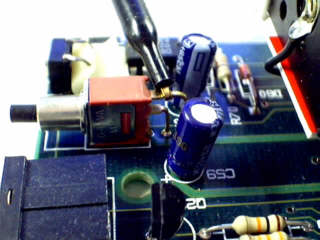 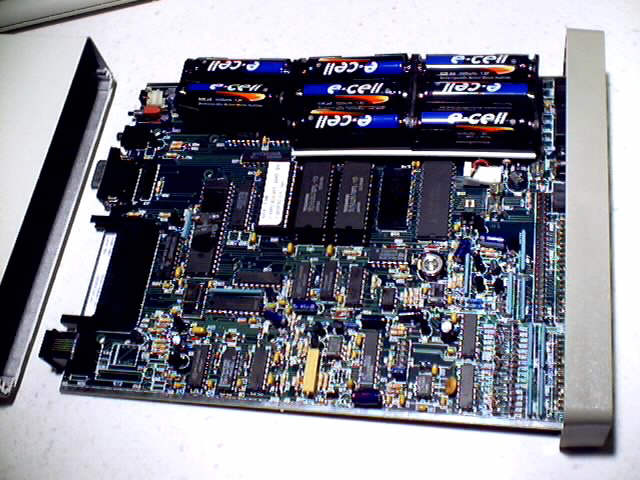 |
|---|
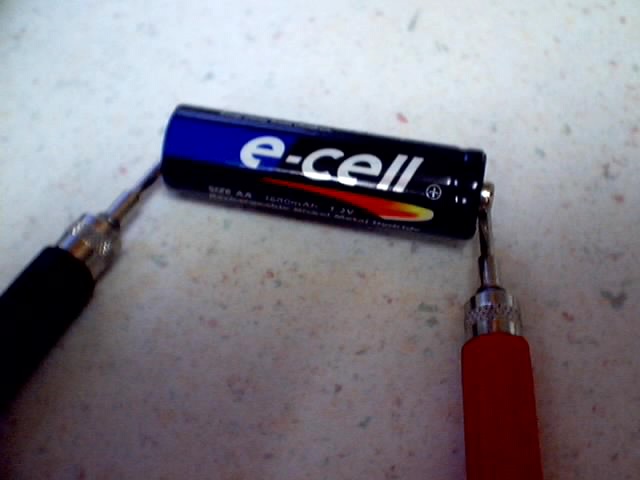
- Step 3) Remove each battery cell and measure the voltage across each and check
the condition of the battery cell holder connectors.
A fully charged cell will measure about 1.2 to 1.4 volts.
- Cells which measure from 1.1 volts to 1.2 volts are in their useful operating
range.
- Cells that measure less than 1.1 volts are discharged and should
be recharged.
- If they measure less than 0.6 volts then they should be
charged in an external charger or replaced with a new cell, because if
they all get below 0.5 volts, the in-rush current needed to charge them
will cause fuse FS1 to blow.
- If they measure close to zero volts, after having been
charged then it is likely the cell has been short-circuit damaged from
over-discharge and should be replaced.
|
|---|
 |
|---|
While the battery cells are removed, check the battery cell holder
contacts for any signs of corrosion and clean them if any corrosion
is found.
| Corroded contacts shown on the left. Clean contacts shown on the right. |
|---|
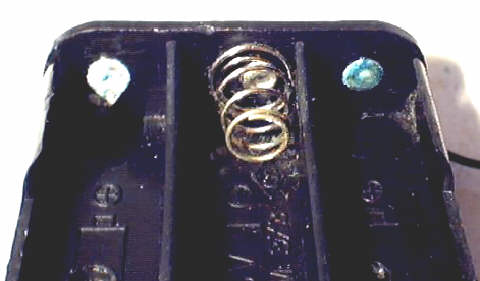 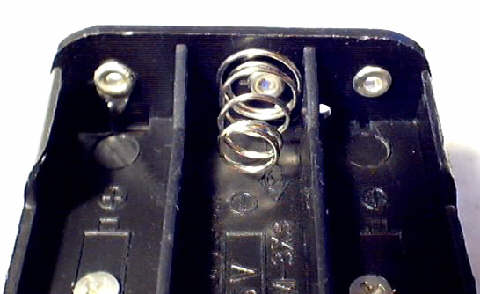 |
|---|
A small file or screwdriver may be used to remove larger
build-ups of corrosion. Acetone or nail polish remover on the end of
a Q-tip can then be used to remove remaining corrosion.
Corrosion can occur if the batteries (NiCad or Alkaline, in particular)
are left to fully discharge in the DLC, due to any leaked chemicals
from the batteries coming in contact with the metal connectors.
After cleaning the cell holder contacts or if the contacts appear lose
then use a small pliers over the end of the cell holder to squeeze and
tighten the crimped-type contacts.
It is recommended to recharge the batteries in the DLC overnight before
each use and recharge them at least once per month or two, when not in
use or simply remove them for longer term storage.
NOTE: If you need to use Alkaline type batteries, say in the situation
where you are out in the field and the rechargeable batteries have run down,
DO NOT connect the A/C adapter to the DLC while the Alkaline batteries
are installed. Any charging will cause Alkaline to be discharged from
the battery cells and will cause corrosion to the battery cell holders
and can etch away printed circuit trace connections on the DLC card
itself.
- Step 4) If the cells measure 0.6 volts or more then replace them into
the battery pack cell holders. Replace any empty cell positions with
known good battery cells.
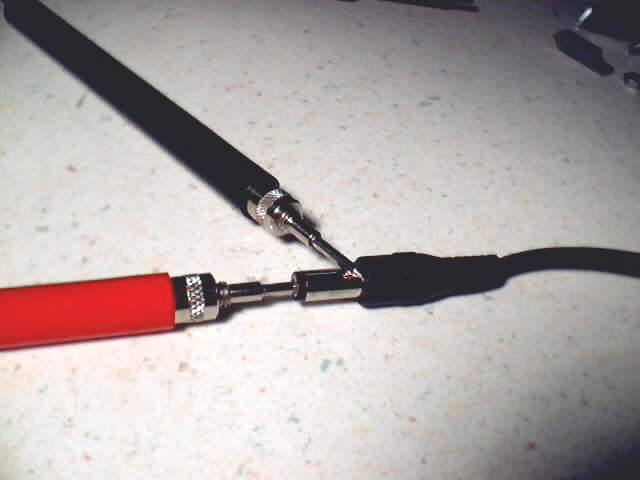
- Step 5) Check the A/C adapter output by connecting the A/C adapter to
a wall outlet and measure the voltage at the plug as shown below
(voltmeter red lead to center of plug and black lead to outside
of plug):
| The voltage should measure anywhere from 14.5 to 17 volts, depending
on the A/C adapter shipped with the system. |
|---|
 |
|---|
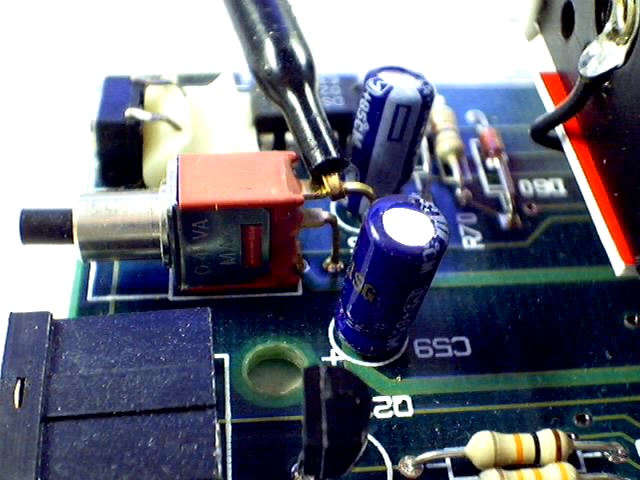
- Step 6) Connect the voltmeter ground clip lead (black) to the top lead
on switch SW2 (upper left-hand area in above picture, shown close-up below):
| This will be the reference point for all other measurements. |
|---|
 |
|---|
- Step 7) Connect the A/C adapter plug to the Power input jack on the DLC front panel.
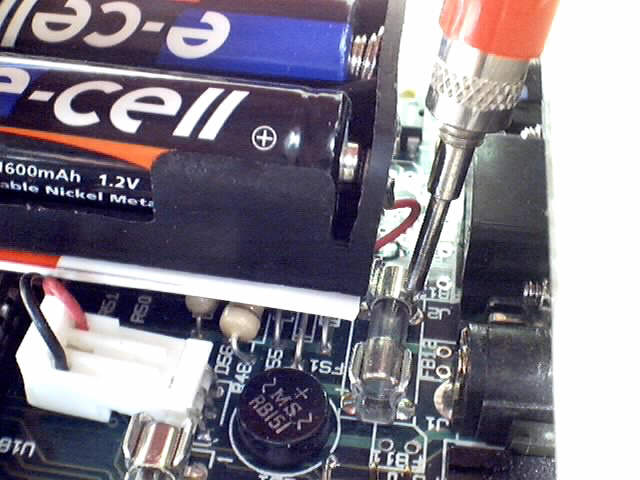
- Step 8) Using the voltmeter positive probe (red), probe the far end of fuse FS1,
located between the DLC front panel and the battery pack, as shown below:
Depending on the A/C adapter shipped with the system, this point should measure
from about 13.9 to 15 volts with all batteries installed.
If this point measures less than about 2 volts then the DLC is not getting power
from the A/C adapter.
If this point measures more than about 9 volts then continue with the next step.
|
|---|
 |
|---|
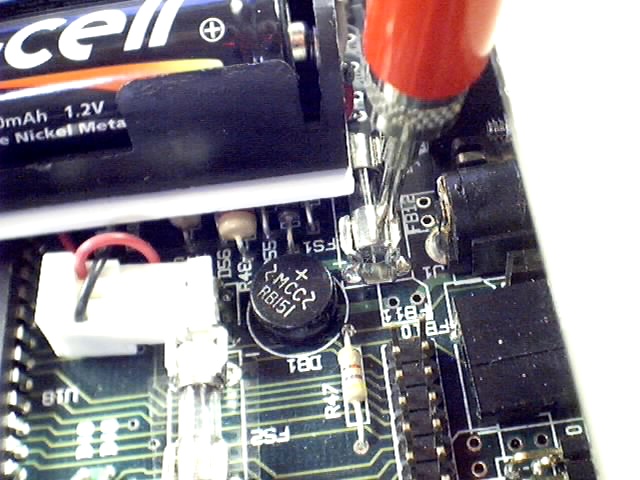
- Step 9) Now probe the closer end of fuse FS1, as shown below:
NOTE: Also, check to see if either end of the fuse is loose. If a fuse had
been replaced, it may be possible that the fuse clips may have become sprung
enough that one of the ends of the fuse may not be held tightly. A symptom
of this can be intermittent power-offs. It one end or the other is loose, remove
the fuse and then squeeze the fuse clips together. Carefully replace the fuse and
verify that it is being held tightly.
This point should measure about 20 millivolts (0.02 volts)
less the other end of the fuse.
If the difference is much greater and this end measures about 0.5 volts or less
then fuse FS1 is indeed blown. Replace it with a new fuse. |
|---|
 |
|---|
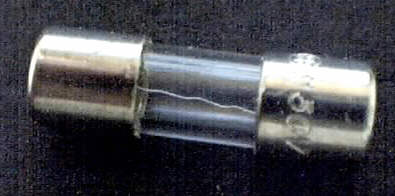
| A good fuse has a little silver looking wire through it, as shown
below. A blown fuse will have a break in the wire. |
|---|
 |
|---|
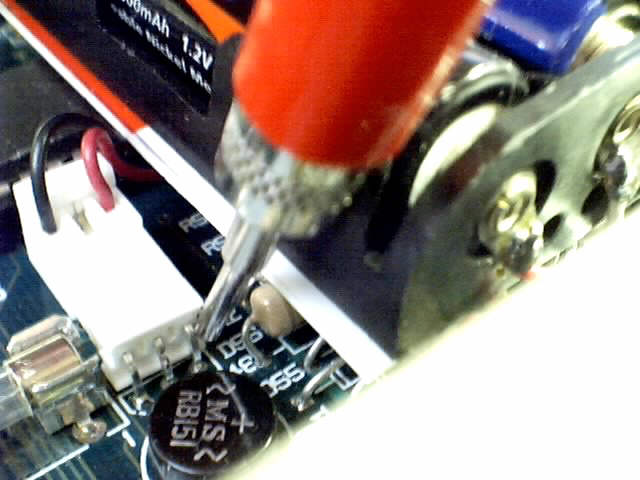
- Step 10) Probe the battery pack connector (rightmost of the three) corresponding
to the red wire, as shown below:
| With the A/C adapter connected to the DLC, this point should measure
a little over 11 volts. |
|---|
 |
|---|
Remove the A/C adapter from the DLC and re-measure the same point as above.
With good batteries installed, this point should measure somewhere between
8.8 and 11.0 volts depending on the charge condition of the battery cells.
If so, reconnect the A/C adapter to the DLC and continue with the next
step below.
If it measures low (less than 2 volts) then there is a connection problem
in the battery pack and most likely a corroded battery cell connector.
Remove the battery cells, re-check the battery cell holder connectors, and
re-clean as necessary as described above. If that still does not solve
the connection problem then contact CROPSCAN, Inc. to discuss
obtaining a replacement battery cell holder pack.
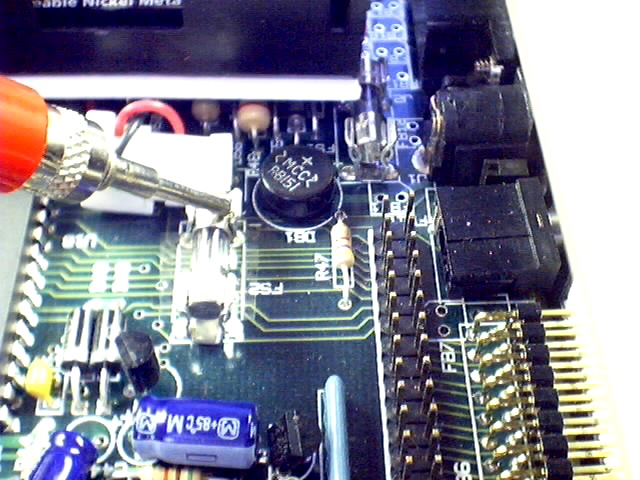
- Step 11) If your DLC does not have fuse FS2 (Model 92 DLCs) then skip this step
and go to the next step, otherwise probe each end of fuse FS2, shown below:
NOTE: Also, check to see if either end of the fuse is loose. If a fuse had
been replaced, it may be possible that the fuse clips may have become sprung
enough that one of the ends of the fuse may not be held tightly. A symptom
of this can be intermittent power-offs or no power-ups. It one end or the other is loose, remove
the fuse and then squeeze the fuse clips together. Carefully replace the fuse and
verify that it is being held tightly.
| If both ends of the fuse measure very close to each other then
fuse FS2 is good. If the fuse is blown then they will differ in readings
by at least 1.5 volts. Replace the fuse if it is blown. |
|---|
 |
|---|
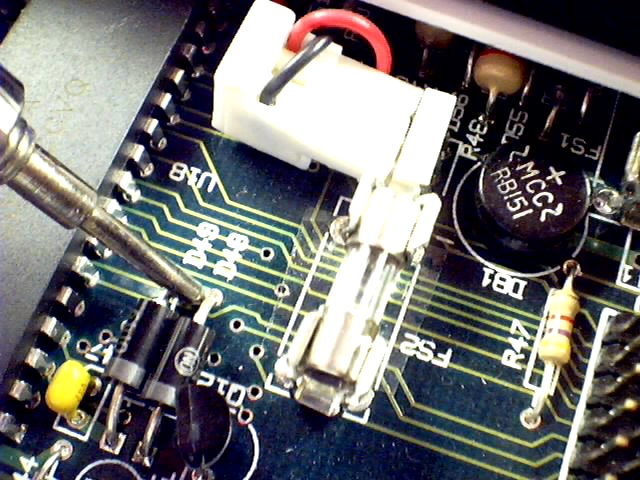
- Step 12) Probe D48 and D49, as shown below. D48 and D49 are connected together
on the card, so you may probe either one.
| This point should measure between about 5.7 to 5.9 volts, if fuse FS1 is
good (not blown), indicating that the DLC internal voltage regulator circuit is functioning correctly.
If this voltage is much lower or much higher then contact
CROPSCAN, Inc. to discuss return of the DLC for repair.
If your system was purchased through a CROPSCAN, Inc. Reseller,
then the return and a possible loaner will have to be arranged through them. |
|---|
 |
|---|
This concludes the test of the essential power related items.
Other Considerations / Operation:
The DLC normally powers-on (LED turns red) when the DLC receives a
character from the CT100 or TERMINAL program running on a PC. If the DLC
receives an Enter character as the second character within a couple
seconds after the first character, it will set its serial baud rate
based on that of the CT100 (300 baud) or TERMINAL program (9600 baud) or
the baud rate of some other serial terminal (9600 baud maximum) and if
the DLC receives an Enter character as the third character within a
couple seconds after the second it will stay powered on and operate
whatever program is loaded in the DLC, otherwise the DLC will go back to
sleep.
So, the normal wake-up operation of the DLC is to have a terminal
connected to the DLC and press the Enter key at approximately one second
intervals at least three times. The first Enter key wakes the DLC, the
second Enter allows the DLC to automatically determine the correct baud
rate to use and the third Enter is for verification. If other than the
Enter key is being pressed, the DLC will simply and automatically go
back to sleep on the assumption that the character input may be coming
from some other serial source or an operator not pressing the correct
key (i.e. Enter key).
The DLC.BAS or MSR.BAS programs, running in the DLC can be configured to
leave the DLC powered-on continuously (i.e. not automatically
power-off), however the default setting is to automatically power-off
after 255 seconds of operator inactivity (i.e. no keystrokes for 255
seconds). It may be possible, had there been an interruption of normal
program execution or if you are running some program of your own in the
DLC, for the DLC to stay powered-on continuously.
If the DLC.BAS or MSR.BAS program is loaded in the DLC and the DLC is
not powering-off then press and release the Soft RESET button recessed
in the back panel of the DLC. You will need a small pointed object, like
a bent paper clip to reach through the small Soft RESET hole to activate
the Soft RESET. If the DLC is operating properly, a Soft RESET will
cause the DLC to go back to sleep (power-off and LED to go dark) within
several seconds of pressing the Soft RESET.
If the DLC does NOT power-off after pressing the Soft RESET then you may
try pressing the Hard RESET. The Hard RESET will cause the DLC's program
and data memory to be erased and and the DLC will 'Beep' once to
indicate that has happened. After the Beep, the DLC will be
expecting to receive two Enter keys so it can establish the Terminal
baud rate. After that, the DLC will send a prompt asking if Security
should be enabled. Normally you would respond by typing N for No and
press Enter. The DLC Main Menu would then appear. At this point, you
would take option 10 to put the DLC to sleep and then
Reload MSR Program and Configuration/Calibration.
If the DLC does not power-off after a Soft or Hard RESET or does not
sound a Beep after a Hard RESET then the DLC is malfunctioning and should
be returned to CROPSCAN, Inc. for diagnosis and repair.
 CROPSCAN, Inc. Home Page
CROPSCAN, Inc.
1932 Viola Heights Lane NE
Rochester, MN 55906 USA
Phone: (507)285-9230
Email: Cropscan@compuserve.com
URL: http://www.cropscan.com
©2017 CROPSCAN, Inc.
all rights reserved



 CROPSCAN, Inc. Home Page