Setup/Assemble MSR System Hardware

Last update - 12/6/2012

The Multispectral Radiometer (MSR) System is shipped partially assembled. The MSR program is pre-installed and pre-configured in the Data Logger Controller (DLC). The following instructions and pictures show how to complete the assembly and the installation of the MSR Software.

After removing the equipment from the shipping containers,

  1. Attach the MSR Mounting Bracket (MSRMB) on the pole. Note: The pole you received may look different than the pole pictured here, however the attachment of the Mounting Bracket will be the same.

    Pull the detent knob (at right in picture below) and extend the inner pole section:

    Position the MSR Mounting Bracket (MSRMB) over the end of the pole:

    Insert the carriage bolt, turn on the wing nut, but do not tighten yet. This makes aligning and inserting the screw easier, in the next step:

    Insert the bracket position retaining screw in the desired mounting bracket position hole. The position shown is probably the most likely used position, but will depend on your particular application:

    Tighten both the position retaining screw and the the wing nut on the carriage bolt. Be sure the square part of the carriage bolt fits into the square hole of the MSR mounting bracket:

  2. Attach the MSR Spirit Level Attachemt (MSRSLA), CT100 Mounting Bracket (CT100B), and Radiometer on the pole.

    It is suggested that the CT100B be positioned just above where you would likely hold the pole, allowing you to both hold the pole and operate the CT100 hand terminal, to initiate scans, with the same hand. It is suggested to mount the MSRSLA at approximately knee height such that you can look nearly straight down at it to par level the radiometer prior to initiating a scan, during normal operation.
    Loosen the two black knurled thumb knobs on the Radiometer, slip into the two slots on MSR Mounting Bracket and then hand tighten (see below).

  3. Par level adjust the Radiometer and the MSR Spirit Level Attachment.

    Position the Radiometer and pole up against a vertical wall or door as shown above, with the Radiometer flush against the wall. Place the line level on top of the radiometer, as shown below, and reposition the pole, as necessary, to position the bubble in the center of the line level:

    Adjust the MSRSLA on the pole and then position of the L-bracket to center the bubble in the center of the spirit level circle. When in position fully tighten both wing nuts:

  4. Attach the Radiometer cable.

    Attach the Radiometer cable, MSR87C-9 to the radiometer and tighten the two retaining screws, either by hand or with a small screw driver. Note: The Radiometer cable color and connector design may vary from that pictured:
    Slip the cable into the white nylon cable retention clip near pole extension adjustment knob near the upper left corner of the CT100 (in picture below). The other end of the MSR87C-9 cable should already be attached to either an MSR Cable Adapter (MSRCA) or MSR Cable Adapter Box (MSRCAB), depending on the particular MSR system ordered.

  5. Attach the CT100.

    Attach the CT9M9M-5 cable (end labeled CT100, with gender changer attached to it) to the CT100 Hand Terminal and attach the CT100 to the CT100 mounting bracket already on the the pole:
    Attach the other end of the CT9M9M-5 cable (labeled DLC) to the DLC RS232 connector (on front panel of DLC).

  6. Check completed assembly.

    Completed MSR system assembly should appear as follows:

Installing The MSR Software

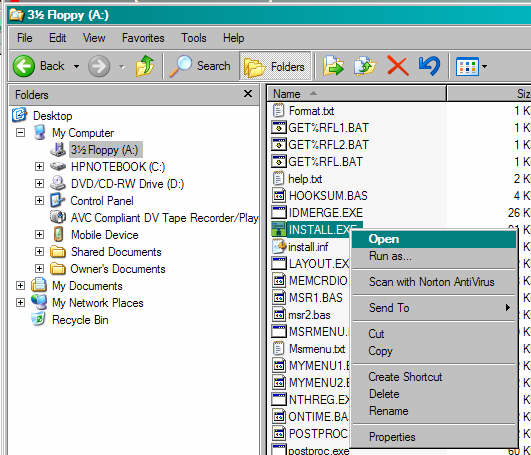
  1. Remove the MSR Software CD-ROM from the manila envelope.

    CROPSCAN, Inc. SOFTWARE LICENSE AGREEMENT

    By installing or using the enclosed Software, you are agreeing to be bound by the terms of this Agreement, which include the license and limited warranty.

    LICENSE

    CROPSCAN, Inc. grants to you the end user the right to copy the enclosed Software onto a single computer and the right for you and others to use that copy of the Software on that single computer. You may copy the Software onto multiple computers (your office PC, lab PC, or field laptop) provided that only one copy of the Software is used at any time.

    Where the Software is copied onto multiple computers or is used on a network or file server where more than one copy may be used at the same time, you must purchase a number of copies of the Software equal to the number of users who will use the Software.

    You may transfer the complete Software and the accompanying materials together on a permanent basis provided you do not retain any copies and the recipient agrees to the terms of this Agreement.

    COPYRIGHT STATEMENT:The Software is owned by CROPSCAN, Inc. and is protected by United Stated copyright laws and international treaty provisions. Therefore, you must treat the Software like any other copyrighted material except that you may (a) make copies of the Software for backup or archival purposes and (b) transfer the Software from floppy disks to hard disks provided that the Software is used as specified herein. You may not copy the written materials accompanying the Software.

    OTHER RESTRICTIONS: You may not lease, rent or sublicense the Software. You may not transfer the Software of the accompanying written materials except as provided above. You may not reverse engineer, decompile, disassemble or create derivative works from the Software. If you later received an Update to this Software or if this Software is an Update to a prior version, any transfer must include both the Update and all accessible prior versions of the Software.

    WARRANTY

    All parts of the Data Logger Controller, Multispectral Radiometer and Software are warranted by CROPSCAN, Inc. against defects in material and workmanship for one year from the shipping date to the original purchaser. If any part of the system manufactured and sold fails to operate properly as specified in the USER’S MANUAL during the applicable warranty period, CROPSCAN, Inc. will replace the defective part or restore it to its normal operation without charge for parts or labor.

    In order to obtain redress under the terms of the warranty, the customer must notify CROPSCAN, Inc. of the defects before the expiration date of the warranty period and make suitable arrangements for performance of the repair service. Transportation to CROPSCAN, Inc. and return are a customer expense. Liability is limited to repair or replacement of defective parts. Damage due to abuse, accident, alteration or corrosion are not covered by this warranty. No other warranty is expressed or implied.

    Other than the obligation of CROPSCAN, Inc. expressly set forth herein, CROPSCAN, Inc. disclaims all warranties of merchantability or fitness for a particular purpose. The foregoing constitutes CROPSCAN, Inc.'s sole obligation and liability with respect to damages resulting from the use or performance of the instruments and in no event shall CROPSCAN, Inc. or its representatives be liable for damages beyond the price paid for the instruments, or for direct, incidental or consequential damages.

    Repair policy following warranty expiration: Ship the defective component to CROPSCAN, Inc. Charges: Labor at $40.00 per hour plus cost of defective parts and return shipping costs (labor rate subject to change without notice).

    CROPSCAN, Inc. Tel: (507) 285-9230
    1932 Viola Heights Lane NE Fax: (206) 339-5770
    Rochester, MN 55906 Email: cropscan@compuserve.com
    Internet: www.cropscan.com

  2. Insert the MSR Software Diskette or CD-ROM into your PC.

  3. Locate the INSTALL program on the Diskette or CD-ROM and Run (Open) it:

  4. If you did not read the License Agreement above, read and scroll through it at this window. When done, Click the Install System button:

  5. Click the OK button to install the MSR Software to the MSR folder:

  6. Click the 'OK - Install in above Group' button to create a CROPSCAN Program Manager Group:

    A progress bar window will display progress of the install:

  7. Click the OK button at the following window:

  8. The Installation Complete message will appear.
    Click the 'Yes - execute' button:

  9. The CROPSCAN MULTISPECTRAL RADIOMETER SYSTEM MENU will appear:

  10. Proceed to page 5 of the MSR User's Manual.
    Ignore the copying of the program diskette and do not type then MSRMENU instructions in step 3.
    Also, skip the entry of the RECORD command settings on page 8, step 3 and on page 9, step 4, because the items to be recorded were pre-configured prior to the MSR system being shipped.


CROPSCAN, Inc. Home Page

CROPSCAN, Inc.
1932 Viola Heights Lane NE
Rochester, MN 55906 USA
Phone: (507)285-9230
Email: Cropscan@compuserve.com
URL: http://www.cropscan.com

©2017 CROPSCAN, Inc.
all rights reserved